| Got it out in one piece! |
| Main Index | < | Our House | < | Kitchen Remodel | < | Got it out in one piece! |
![[ PREVIOUS ]](../../../pics/buttons/left.png)
|
![[ INDEX ]](../../../pics/buttons/up.png)
|
![[ NEXT ]](../../../pics/buttons/right.png)
|
| The Kitchen Rebuild '97 : Slide 5 of 12 | ||
|
 |
|
| [ Click on the Pic to Expand to Full Size (ksld5.jpg : 640 x 439 36.61k May 13, 1998) ] |
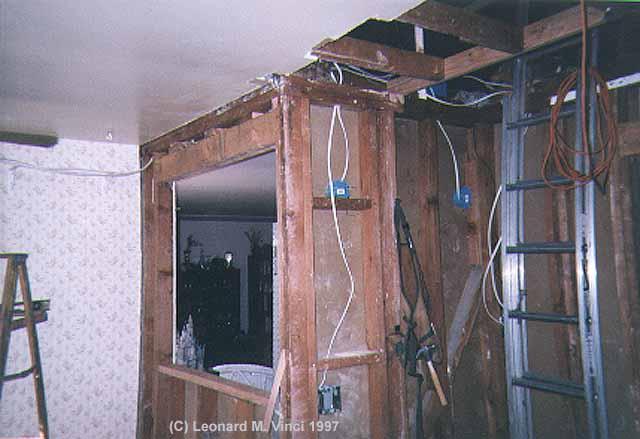
One new skill we learned with this project was how to deal with load-bearing walls. We widened the doorway first (not shown here) as a practice cuz we were just extending and replacing an existing header. That went without a hitch so we tackled the bar-hole. This was a bit trickier. For some weird reason we wanted to take it out in one piece without removing the living room sheet-rock first. We shoved a couple of 2x4s in to hold the ceiling up and cut away the studs. The beam only sagged a little :). We then wrestled the new header into place (that's the big board on the top). We still have the "hole" out in the backyard.
Also seen in the shot: the wiring for the new sconces we installed in the living room, and the new switch for the ceiling fan (later raised about 18" away from the back burner of the stove:) ) The ladder leads to my sauna, where I spent a couple of weeks playing with electricity. I had to completely redo the 50 year old wiring up there. Now everything is marked and up to code.
Text Last Modified Wed Sep 17 13:11:19 2003
|
|
|
|
| The Kitchen Rebuild '97 : Slide 5 of 12 | ||
| Main Index | < | Our House | < | Kitchen Remodel | < | Got it out in one piece! |
|
|
 |
 |
 |
 |
 |
|
|
|

|
|
Site contents Copyright © 1996 - 2010, by Leonard Vinci
Please do not use the contents of these pages without written permission. That includes
linking to any of the pictures or quoting any of the text. Thank you!